Powered By Blogger

Friday, December 20, 2013

Christmas Center Pieces

I started with just the Christmas trees, you know the kind that you get at the Dollar Store to put around a village.
Supplies needed:  Christmas trees, wood plaques, several different types of tinsel ribbons, holiday pipe cleaners, Christmas foam shapes, wire thread, glittery foam holiday shapes, a roll of papers, Mod Podge glue, red felt, red and yellow acrylic paint, and wobblers.
1)      Cut paper to cover the top of the wood plaques (round, square, oval, etc.)
2)      Using the Mod Podge, deco podge the paper onto the wood plaque (I start with this cause it has to dry of at least 2 days or the base will be ruined)
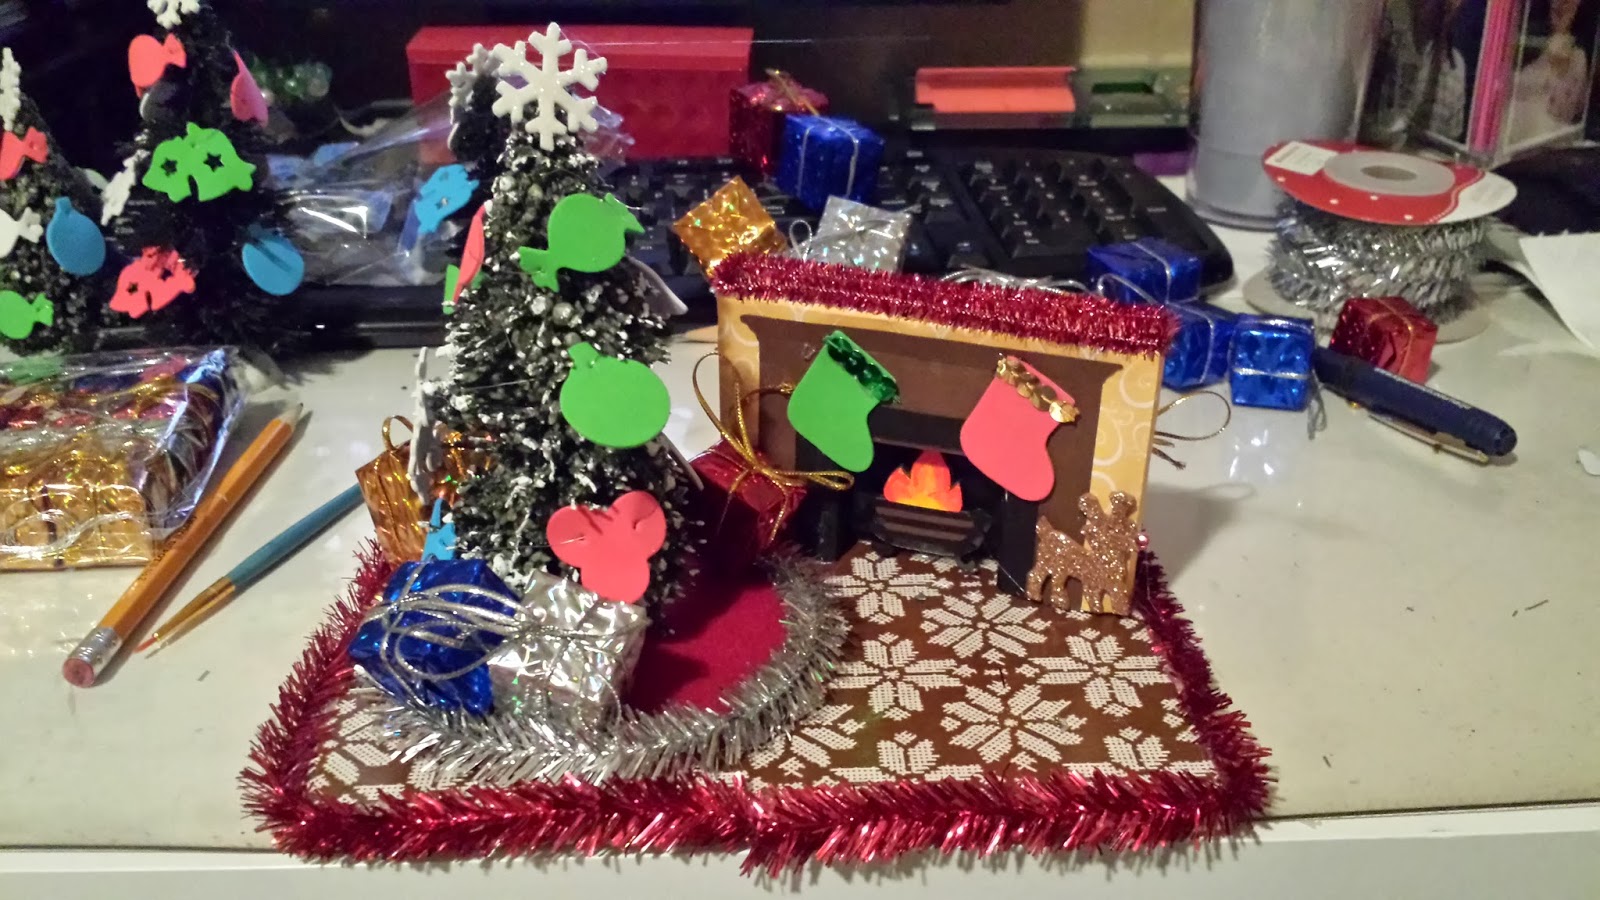
3)      Creating the shape of the fireplace.  Take old manila folder or heavy card board and cut to the size needed.  I cut mine to 4” wide by 2 ½” high by ½” deep for final size leaving ½” for folding to be able to glue it together.  
4)      Using the wire thread string the foam ornaments I used 6 to 7 of them for the smaller trees and 8 to 9 for the larger trees.   Leave enough wire thread on the start and end of the garland to tie it to the top and bottom of the trees.
5)      Using a shape cutting machine cut the shape of the mantel and fire logs.  To make the fire look realistic use the yellow and red acrylic paints to create the fire look.
6)      Take the paper that you picked for covering the fireplace and being the process of transforming the card board shapes into a fireplace. 
a.       Take the mantel cut out and trace the shape of the opening for the logs.  Now cut it open so you can fold the flaps to create a 3D effect.
b.      Now using heavy paper or card stock in black cover the opening to make the look of a fire box.
c.       Take the logs, flames, and grate and glue them together.
d.      Using the wobbler stick the logs to it, cut the excess adhesive base around the shape for the flames.  Set them aside these will be the last thing you will glue down.
e.       Take the paper that you pick for the wall color and cover the shape on all sides (I cut the paper to the size I needed and wrapped it around, gluing it as I go around). Let it dry for a few minutes and then cut open the firebox area out.
f.       Glue the mantel and surround onto the shape.  You should be able to start seeing what looks like a fireplace.
g.      I hot glued the foam stockings (bling out the stockings) to the top part of the mantel.
7)      Now you can start assembling the center pieces.
8)      Cut the felt into circles, using a hot glue gun the garland ribbon to the edge of the skirt.  Make sure you leave an area with no glue so you can open the circle.  This will allow you to wrap the skirt around the trees.
9)      Hot Glue the trees, skirt, mantel and presents to the wood plaque.
Sit back and enjoy your creation.


Sunday, December 15, 2013

Christmas Ornaments for the Cheer Squad

I threw these together really quick not what I wanted to make but time was not on my side this year.  They still came out really cute.


Sunday, December 8, 2013

Wednesday, November 27, 2013

I finally did it!!!!!!!

Update, Update:  I have finally put together the furniture and start to organize the “Craft room/Office”.  Here are the before pictures and the after.  I love the fact that I have more room to move around in and the eventually everything will have its own place.   Now I can get back to crafting.  

Here are the before and after pictures:

Before:


After:


Country-Western Themed Party

I hinted before at the fact that I was doing center pieces for a “Country – Western Party” well this is what they look like.  They had to keep an eye on them cause people wanted to take them home. 

I started by getting 6" plastic boot mugs, western themed paper and small hay bales from Oriental Trading Company, then I bought the bases at Wal-Mart, the acrylic paint, bird houses, ivy sprigs, moss and picket fence I got at Michael's. Oh yeah the brown matte finish spray paint at Home Depot. 

1)  Spray painted the boots in the matte brown. 
2)  Used white acrylic paint as a primer for the details on the boots. 
3)  Painted the boots in 6 different colors: Red, Blue, Green, Yellow, Orange, and 
     Purple. 
4)  Used metallic markers to highlight the painted areas in silver and gold. 
5)  Decoupaged the bases with western themed paper and let dry for about 2 days. 
6)  Painted the bird houses in different colors trying to make then combine with the boots. 
7)  Also painted the picket fences in white. 
8)  Cut the ivy in manageable pieces for the size of the boots.  
9)  Last but not least once everything was painted and ready to be assembled I put all the        pieces together.  (See the pictures below) 


Sunday, November 3, 2013

The craft room - since this room is going to double as a home office I was thinking that I would like a TV that has PC capabilities. This way I can watch TV and do crafts or use the TV screen as my monitor. As for storage I wanted to get kitchen pantries just a couple this way I can keep the things that I don't use all the time behind closed doors. Need a work surface and shelfs. Anyone out there have other suggestions I don't want to spend a lot of oney but I do need to make sense of my mess. My original craftroom/office was 14x11 with a walk-in closet, but as the kids grow my daughter wanted the walk-in closet and I caved. Your ideas and suggestions will be greatly appreciated.

Baby Shower - My kids step-sister was having a baby and my daughter wanted something special for the party, something that could not be bought. So mom to the rescue.


Birthday Cakes - I made my daughter a paper cake to commerate her 21st birthday (she loved it). her cake was done various shades of purple since that is her favorite color. But I also created a 2nd cake done in pink as a gift for someone that I know. The idea came out of a Cricut magazine but I changed it to be my own. The one in the magazine was small and only one layer and did not have the same flowers.


St. Patty's Day party. I was asked to create center pieces for the party, I had seen a much smaller version of this in one of the Cricut magazines. I used file folders to make the base and top of the hat. I used my Cricut cutter to cut the circles and the flowers. All the other items were cut by hand (belt, buckle, body of the hat, and the Shamrocks. It took me about a week and half to put everything together in the end they looked great and mede for unique center pieces.